 Please, sweat the small stuff
~ 07 February 2005 ~
This is one of those “allow me to vent” write-ups that I hope isn’t too harsh but ultimately does the greater design community a favor.
Some of you are likely already practicing what I’ll preach, but I see it missed frequently enough that it’s in need of a gentle reprimand.
It involves two things: 1) images that are transformed to a size, say, 75% or smaller from the original size, and 2) the Unsharp Mask filter. Now, I’m speaking in Photoshop terms on that second one, so those of you who speak Fireworks will have to translate for the rest of us.
Here’s the setting: You receive a large image from a client, probably a 300 dpi shot of their building. You’re asked to post it to the site somewhere. So off you go to Photoshop. Image > Image Size or Command-T and you resize with smaller dimensions. A little color/level/contrast adjustment likely follows (or precedes).
Some of us stop there and post to the site. But the savvy designer makes one more adjustment before saving for the web. He or she uses the Unsharp Mask filter.
Here’s a sample shot, with the original resized photo at left, and the same resized photo with Unsharp Mask at right:
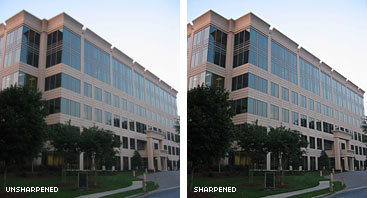
Notice the difference? Look at the detail in the lines of the building at upper left. Check the trees. See how everything is just a bit crisper?
You lose some clarity in the original image when you resize to a smaller state, and the Unsharp Mask helps restore some of that clarity. The name is a bit deceiving at first, because the “Unsharp” Mask actually “sharpens” the picture.
And it’s a snap to use. Just click Filter > Sharpen > Unsharp Mask… and choose a percentage value for the amount.
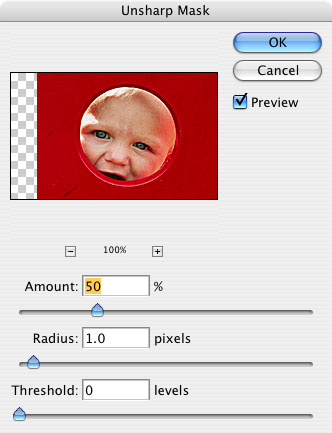
I generally choose a range between 35% and 50%, and I rarely choose a value over 75%. After all, a value of 100% is essential the same as Filter > Sharpen > Sharpen. I recommend you avoid going that far unless necessary, as you may over-sharpen and begin producing shadow lines of sorts.
Here’s another example:
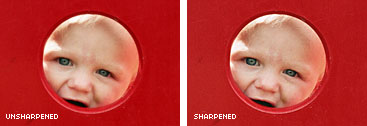
Again, it’s tough to spot the difference at first, but look at the eyes and the hair at top and you’ll notice a subtle difference.
Here’s one last example that perhaps best demonstrates the need for the Unsharp Mask:
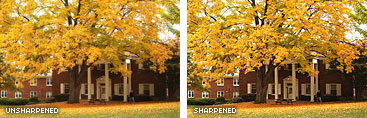
The amount of detail in the leaves makes for a perfect setting to use the filter. The difference between the two should be quite obvious in this last example.
End of class. Thanks for coming.
![]()
73 Comments
Stock photography, type, and killer tees. Genuinely recommended by Authentic Boredom.
The Unsharpen Mask is great. However, try this method. After you have resized, levels and etc., duplicate your layer. In the top most layer, change its mode to Overlay. Now go to Filters > Other > Highpass. The sharpening effects as result of a highpass(in overlay mode) is much crisper (and more flexable) than the unsharpen mask. These is the procedures that third-party filters often use behind the scenes. :)
whew - I thought you were going to yell at us.
Good points. I should also mention that different images may require different approaches: small amount (50-75) + large radius (1-5) vs. large amount (400-500) + small radius (0.1-0.2), compensated with threshold values of 5-20 depending. I don’t know of any rule of thumb on when to apply which so playing around for the best result is the best approach.
To avoid color shifts or USM halos it is also a good idea “to fade to luminosity” (Edit > Fade to Luminosity) and adjust opacity as you see fit.
Lastly, USM should be applied last … I find a lot of people apply USM and then resize!
Thanks for the tip, Cameron … I’ve seen that menu option millions of times, but never used it …
oh, for those of us Fireworks freaks, the path in FW is virtually the same: just select Filters > Sharpen > Unsharp Mask… and there you have it.
Paint Shop Pro has this option too, under Effects> sharpen> UnsharpMask
Good to know…..:!
I admit that I’ve never used that option before. Now that I’ve seen the differences in the photos, I’ll be sure to take your advice and use the Unsharp Mask.
One thing to point out, though. In the first example (the building), the biggest difference to me seems to be the lower right at the building’s entrance. But that’s just my opinion and doesn’t change my feelings on the usefulness of your article…
Since I’m guilty of the aforementioned “sin”, how many times do I have to write “I will use the Unsharp Mask filter” on the chalkboard? :)
For web graphics, I often hit Filter > Sharpen > Sharpen and get good results without messing around with options. However for print projects, I use the same method described as David F, which was revealed to me by a photo-retouch guy at a service bureau. For fashion photography of women where you need both crisp lines and soft gradients, it is awesome.
My usual unsharp mask settings are 120%, radius 1.6, levels 12.
I almost always convert the image to LAB color and unsharp the luminosity channel. This sharpens only the grayscale component of the image, not the color. This helps prevent unwanted halos from oversharpening. Then convert CMYK or RGB.
Have you noticed that in Photoshop CS there are two new resampling options in the image size dialog box? The new options are Bicubic Smoother and Bicubic Sharper. I haven’t compared the results with unsharp masking, but would be interested if someone has.
Some wise advice surfacing in the comments…
I would have to agree with David #2, this a great trick that i’ve been using for years. Not only can you try out different blending modes, but you can also erase parts of the high pass layer, giving you variable blended sharpening!!
As an amateur PhotoShop user this is a great tip. I’d seen that option before but, as you say, it’s badly named. “Unsharpen”?? Why would I want to do that.
Thanks for sharing the wisdom, your helping make the rest of us look a little less dense!
@Michael: W/o getting into a major argument I’d say that ‘Fade to luminosity’ method is preferable for most applications since switching between color modes (RGB/CMYK > LAB > RGB/CMYK) can introduce quantization errors that result in data loss. The damage is negligible (unnoticeable) in most cases, but regardless I find the extra steps unnecessary for a simple sharpening.
good tip is the post and in the comments. thanks everyone.
Naturally, this is the general rule and there are situations where you may want to break it for the sake of effect. ie., the third photo in your series Cameron — I think a case could be made for the blurrier option on the right being a bit more tranquil and capturing the essence of a fall day just a little better. But you do need a good reason for breaking the rule.
Blurrier on the left you mean, Dave?
Erg. Yeah, left.
Another trick I learned long ago is to use the unsharp mask filter consecutive times, reducing the percentage each time by half. This is done when you need to sharpen more than 100%, and gives you better control over the process.
I sometimes run USM mask when I resize, but it often leaves behind more problems than it solves. In those cases, I give Fred Miranda’s Intellisharpen II Plugin a spin and it produces excellent results. His other actions and plugins are also great, but some are optimized for specific camera’s. Have a look at his photographs on the main page… he really knows what he’s doing.
Re: Michael Joyce’s quesiton… Bicubic Sharper should be used when reducing an image and Bicubic Smoother when you need to enlarge an image. And thanks Cameron for the tip… I just found out about it 2 weeks ago and it has already saved me some headaches!
Good points, but don’t forget the “radius” control. It’s purpose is to adjust the width of the “halo” across which sharpening is applied — and that will depend on the resolution of the final output device. To calculate the right value, use the device resolution, divided by 200. For a screen resolution of 96ppi, use Radius 0.5; for a 300 dpi inkjet print, 1.5 is appropriate. Set the Radius first, then adjust Amount and Threshold to taste. :)
Most images need sharpening, but the unsharp mask doesn’t fit all images. I find that complex imagery with alot of contrast it is best to sharpen with Gaussian Blur. By duplicating the image twice, one for dark areas and one for light, you have better control over the highlights and shadows. Sample this by setting your blur to 2.0 and changing the layer blends to Lighten, Darken, or multiply.
I used to use the unsharp mask filter, but I learned of an even easier method a few months ago and I haven’t looked back;
When you bring up the ‘Image Size’ box in PS, there’s an option at the bottom of the window called ‘Resample Image’. If you select ‘Bicubic Sharper’, PS will hold the detail when you shrink the image.
You can even set ‘Bicubic Sharper’ to the default setting in PS’s preferences.
I put together a quick comparison for my own benefit based on David F. and Michael Joyce’s comments:

Using the High Pass and Unsharp filter methods give more control than the Bicubic Sharper. Bicubic Sharper seems to do a comparable job compared to Unsharp Mask but it is based on a predetermined setting that gives the user no control.
And Bicubic Smoother is for different purposes as Joshua Brewer explains.
I always forget about the Unsharp Mask. Thanks for the reminder!
The highpass mention and “high fashion” by David F and Kevin got me looking for what I could do with gimp.
Try this:
1. duplicate the layer
2. gaussian blur
3. invert
4. desaturate (i want to apply the high pass filter to luminosity only)
4. switch layer mode to overlay
From a forum called the gimp user group 64.233.161.104
Keep in consideration that it is also very helpful to resize any hi-res images at 50% incriments if possible.
Also, I have an action set up of UnSharp Mask at 20%, 1 and 1. Subtle but very effective and as an action it is easy to apply to all images, hi-res or not.
For similar reasons to those mentioned above by Michael Joyce, after I’ve used Unsharp Mask I tend to Fade the filter in Luminosity Mode. It does help with reducing unwanted halos caused by the initial sharpening.
Very timely information with some small screenshots I am doing today. Thanks!
Since nobody has seemed to add it yet, I speak Fireworks. Much of this is taken from the documentation.
To sharpen an image using Unsharp Mask:
- In the Property inspector, click the Add Effects button, and then choose Sharpen > Unsharp�Mask from the Add Effects pop-up menu.
- Choose Filters > Sharpen > Unsharp Mask.
Note: Applying a filter from the Filters menu is destructive; that is, it cannot be undone except when Edit > Undo is an option. To maintain the ability to adjust, turn off, or remove this filter, apply it as a Live Effect, as described in the first bulleted option in this step.
An increase in radius results in a greater area of sharp contrast surrounding each pixel edge.
Another good one is to…
make a duplicate layer and then “highpass filter” the top layer at a value of 10 (or so). Then set the blending mode to hard light at 30%-70%.
works great on landscapes and faces!
Yeah the USM is the best quick fire tool for sharpening images that need to go to the web. I resize a whole heap of images a day, when creating galleries, so the USM comes in very handy. So handy in fact it has it’s own shortcut, ALT F3, PS CS is great because you can set your own shortcuts, much eaiser than going to filter > sharpen > USM.
Yes, yes!
My procedure normally involves:
Auto levels
Auto Contrast
Unsharp Mask
And I could not live without Edit>>Fade in case one of my steps might me too much.
Hey, thanks for the tip. I’ve used Unsharp Mask in the past, usually when scanning in printed material (brochures, etc.). The Unsharp Mask can get rid of some of the artifacts left from the scanning process.
Another tip for that - scan the item at a higher resolution than what you’ll end up with. If you’re going to end up with 300dpi, scan it at 600. 150? 300. And, if you’re going to put it on the web or other screen-based medium, where your resolution will be 96 or 72 dpi, go ahead and do it at 300. Clean it up, then resample it down and use the unsharp mask.
Use Unsharp Mask filter everyday… but do not abuse it! ;)
You could also unsharp mask the Lightness color channel in LAB mode…
But the HighPass filter is less destructive to the image.
This is very helpful. Thanks. Hope to see more of small stuff, small widgets like this.
I agree wholeheartedly. At a flash conference a few years back, I was given these settings by one of the founding fathers of photoshop and I’ve used them ever since:
150%
.5
4
That’s it. The magic formula. Works every time.
I am with David F and Phil Balchin.
Duplicate layer, high pass filter, set layer mode to hard light and opacity to somewhere between 20 to 60%.
This way you get good control over the sharpening/contrast and you can erase the effects over certain areas like skin.
Use this method or upsharp mask on skintones with extreme caution, unless that person has upset you, it will make any minor wrinkles or skin blemishes very noticeable.
I tried both methods and I like the High Pass option because of the non-destructive quality but there is also something to be said for USM though the two techniques are almost the same thing. Also, Unsharp mask is called that because it was the original darkroom term for the technique. It does just what it says, however. An unsharp mask is a blurred duplicate of the image that is basically overlayed when printing. It acts like a doge and burn at the same time. You can read more about it here.
Somene asked earlier why this filter is called the “Unsharp Mask.” This is one of several Photoshop holdovers from traditional photographic printing. This one involved making a slightly blurred second negative of an original, blurred neg, then sandwiching the two together when printing (usually a contact print). This resulted in a sharper-than-the-original-neg final print. For the curious, a quick search found a more detailed description here: http://www.scenic-route.com/tutorial/psp/tutor/unsharp/Unsharp.htm. You’ll have to scroll down.
The name “Unsharp Mask” comes from an old-school analog technique where you created a duplicate negative that was slightly out of focus (unsharp) and then sandwiched it together (mask) with your original negative to make your print. The magical result was increased contrast around edges, creating the illusion of greater visual sharpness.
The current issue of Electronic Publishing has a great article by Dan Margulis on the finer points of sharpening images electronicaly.
It’s called, “Life on the edge”.
Mr. Margulis consistantly has great articles on image manipulation in this publication and subscriptions can be gotten for free.
I’ve been reading about USM a lot lately and have put it to good use in my photos. I didn’t understand why it was necessary, but I found out that when resizing, some resampling takes place which needs to be fixed.
Also, I always switch to lab mode, turn on only the lightness channel and do USM on that. Google for Unsharp mask Dan Margulis and you can read articles on why. In short, if you USM with colours involved, you’ll get colour shifts and halos at edges. This is eliminated by just sharpening on the b&w shapes.
To be honest, I don’t usually use the Unsharp Mask Feature whenever I resize a photo. For some reason I’ve always gone with the Filter->Sharpen->Sharpen (ctrl+f after one application) method and then using fade sharpen (ctrl+shift+f) to about 70%. It usually gives me the same results.
But I’d agree, decreasing the size of an image and not applying some form of sharpen deserves a kick in the shin… or a stern talking to, whichever you prefer.
In Fireworks, there is indeed the same command.. Filters / Sharpen / Unsharp Mask.. where you can specify Sharpen Amount, Pixel Radius, and Threshhold - whatever those things mean.
There is also the quick-n-dirty Filters / Sharpen / Sharpen.. and of course Sharpen More.. if you don’t want to worry about settings.
Nice article, good advice. Will probably not be found by the same people who take JPGs straight out of a digital camera and post 1+ or bigger MB monstrosities to their sites.
Great post - I’ve linked to it at http://photosydney.blogspot.com/2005/02/unsharp-mask-more-photoshop-tips-for.html
Even though the USM filter is a sharpening filter, it’s still confusing to label the images “unsharpened” v.s. “sharpened.” Calling them “original” v.s. “unsharpened” would probably be better.
Microsoft has got an article, ‘Understanding Shapening’ which explains why sharpening is needed and how to use it. It tells you to use the unsharp mask filter twice when editing a photo.
Interesting point, Elliott.
Some time ago I made an action combining some of the ideas above. It’s pretty self explanatory.
FYI: In the Gimp, this is under Filters->Enhance->Unsharp Mask
And the “Amount” modifier is an arbitrary value between 1 and 5 instead of a percentage as in PS.
Well, I guess I’ll throw in my half-baked idea into the mix as well:
I like to keep my Photoshop (or Fireworks) documents as flexible as possible. If you want to play around with USM percentage values, or at least keep the layer you are sharpening untouched, try this:
1. Duplicate the layer you wish to sharpen
2. Choose Filter>Sharpen>USM on the duplicated layer
3) For the amount, go ahead and max it out…yep, to 500%.
4)Choose “Luminosity” for the blending mode of that layer
5) Use the opacity slider to show that layer…the higher percentage, the more USM will be applied.
Doing this I have noticed sometimes that my image looks better at 20% than 30% or vice versa. Doing things in this way lets you experiment with out having to undo and redo all the time.
I just read your post about the unsharp mask and a lot of people are confused by the title. So i figured I’d give a little explanation of why its called that.
Try this; opne a photograph in Photoshop and duplicate the layer 2 times (cmd+j). next invert the top layer, change the opacity to 50% (you should see a solid grey) and blur it about 10 pixles. next merge the 2 top layers and change that layer to overlay (option+shift+o). if you toggle the top layer you will notice it sharpens the image.
this is what the unsharp mask filter does. It “unsharpens” the image to sharpen the edges. the amount of the blus is the same as the radius and the amount is if you changed the opacity.
I hope I helped some of you out.
-3°
I definitely agree. Doing some sort of sharpening to a photo is a must in most cases. I have an ImageReady droplet that does the resize and sharpening for all my gallery images. I prefer to use the basic sharpen filter though. Unsharp mask tends to exaggerate the contrast of edges and is best used when prepping art that will receive a dot screen for printing.
When you resample an image down, one way to avoid softness in the first place is to resample in stages, reducing the size by 20-50% on each pass until reaching the destination size.
I don’t have PhotoShop CS, but I suspect that may be what the “Bicubic Sharpen” does internally.
I usually just use Filters / Sharpen to, well… sharpen up my images. It usually chunks ‘em up a bit too much (as you mentioned), so I just fade the filter back by about 65% or so. Works great. It’s fast, and very web-appropriate. I usually save UnSharp Mask for higher-res images for print, though - I’m not totally sure why I do this. I see Mr. Charles G. who also posted does the same thing.
Thanks a ton for this information Cameron.
I have normally used this effect when making icons. Creating different sizes, starting largest to smallest, it always helps the clarity by using the unsharpen mask each size down.
You’re such a “sharp” kid, Cameron.
I would partly agree with Richard Tallent. But in’t resizing itself using a bicubic algorithm, and therefore automatically adds blurring to a picture when resized to anything else than a divisional by 2/4 size? I have done a bit of videoencoding and resizing to something else than 50% normally introduces quite a bit of blurring (oh yeah and much more cpu-consuming) when using a bicubic algorithm.
WOW!
I never knew about that. I’m never happy with shrunken images, so I’ll be sure to use this next time!!
Thanks!
oooh… good advise. I’ve never used unsharp mask before because I never knew what it was for… Now that I’ve tried it I don’t think I am ever going to use plain old “sharpen” ever again.
your best bet is to use this plugin and remove the
guesswork
however why would you want to sharpen for the web, jpeg images go up in file size and have problems with more sharpening
Ben Scott…
Nik’s sharpening tools are ‘so so’. I suggest you run a test though and see the benefits and flexability of using Unsharpen Mask or Overlay with Highpass. I personally have tried many many sharpening plugins including Nik’s and I was just not 100% happy with the results. It’s not only my opinion, its a tested theory I suggest you challenge.
This is also very good to do for images going to print. Gnerally a threshold of zero, radius of .7 and the Amount cranked up pretty high is best. Just make sure there is no halo or ghosting. IT can also save some sligtly out of focus images as well. I still wonder why they call it unshrap mask when it sharpens.
p.s. ALL images out of a digital camera are a little soft by default so no matter where the images is going unsharp mask is needed.
Wow, I’ve had this feature in Canvas for a long time but I’ve never ever used it because I thought it, well, made a picture blurry. :)
Gee, you use photoshop for years upon years, and you still learn things about it. Thanks for the advice Cameron.
Cameron, you have set the natives loose, and it is awesome, lots of nice feedback here. I enjoy reading differing opinions and different tricks of the trade - we all have our ways of getting from point A to point B, and that is what makes this an interesting read.
I found USM a few years back and my life is forever changed…for the better.
Excellent article and comments. I have used PSP for years and alwys use USM, but now I have Photoshop, I will be playing around with these features there, thanks to the handy hints and tips above :-)
will link to this article in my blog, too if that is ok.
That’s a great tip! I knew something was missing from the photos I was working with, thanks!
Save all your sharpening moves as actions, then you can compare results between High Pass and Unsharp Mask, or custom actions/
“Sharpen edges” is a very nice move too.
For anyone interested in surfing a bit there are some free Bruce Fraser actions out there.
i agree with caleb and that’s why i set all of my camera’s “in-camera” sharpening to zero or none - because i’d rahter make my own decisions on what needs it and what doesn’t later.
and i’ve been using the “High Pass Set to Overlay/Soft Light/Hard Light” method for awhile now and love it - since it’s on its own layer essentially you can sharpen the areas you’d like and set the transparency - almost like an adjustment layer for sharpening..
I can honestly say that I rarely use the Unsharp Mask when resizing images for the web, but after seeing the difference it makes, I won’t be making that mistake anymore. Thanks for enlightening us (again).
Authentic Boredom is the platitudinous web home of Cameron Moll, freelance new media designer, author, and speaker. More…

Full-time and freelance job opportunities. Post a job...
A selection of fine reading, available for a limited time only:
- Jobs home page reorg
- Coming soon: Mobile Web Design, the book
- Dyson ad: Text as more than just words
- Setting sail for Europe
- Review: Sumo Omni bean bag chair
- Dashboard widget for Authentic Jobs
- Limited-time offer: $99 listings
- Nine skills that separate good and great designers
- Fire sale
- Introducing AuthenticJobs.com
 CSS Mastery: Advanced Web Standard Solutions A solid round-up of indispensable CSS design techniques by Andy Budd, Simon Collison, and Cameron Moll.
 Mobile Web Design A guide to publishing web content beyond the desktop. Tips, methodology, and resources. Now available.
![]() Letterpress Posters The unassuming beauty of a freshly letterpressed print.
Letterpress Posters The unassuming beauty of a freshly letterpressed print.
![]() That Wicked Worn Look. Techniques for that worn, aged, distressed look.
That Wicked Worn Look. Techniques for that worn, aged, distressed look.
![]() Mister Retro Machine Wash Filters Turn the dial to “Instaworn” with these filters.
Mister Retro Machine Wash Filters Turn the dial to “Instaworn” with these filters.
![]() Blinksale Dive in and enjoy shamelessly easy invoicing from Firewheel Design.
Blinksale Dive in and enjoy shamelessly easy invoicing from Firewheel Design.
![]() Basecamp My preferred web app for internal and client project collaboration.
Basecamp My preferred web app for internal and client project collaboration.
![]() HOW Conference Austin, June 24–27. Pentagram, Adobe, P&G, et al.
HOW Conference Austin, June 24–27. Pentagram, Adobe, P&G, et al.
![]() Web Design World Seattle, July 20–22. Practical sessions on web design.
Web Design World Seattle, July 20–22. Practical sessions on web design.
![]() Stimulate Salt Lake City, September 2009. Entrepreneurship and design conference.
Stimulate Salt Lake City, September 2009. Entrepreneurship and design conference.
Linkage:
Follow me: ![]()
1 Karl B ~ 07 February 2005 at 06:11 AM
I am glad you mentioned this. I always use this feature and have my settings at 150%, it makes so much difference :)