 Authentic Wisdom: Jesse Bennett-Chamberlain
~ 02 November 2004 ~
Recipe for a Creative Workspace
By Jesse Bennett-Chamberlain
![]()
![]()
After hiring my first employee a couple months back I was in desperate need of a new desk that could seat the two of us comfortably. The style of desk I was looking for ending up being close to $3,000. About $2,800 more than my budget.
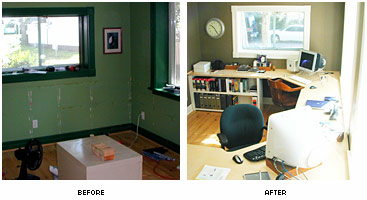
Alas, I stole some “inspiration nodes” from the desk I had my eyes on and decided to build one myself.
Preparation

I started by mapping out my floor plan in Adobe Illustrator and then created all of my existing office furniture to scale. I used a simple ratio of 1 inch = 1 mm, which seemed to work pretty good. I tried a couple of different layouts and finally decided on the one included in the download file below.
Laying it out first in Illustrator allows you to figure out how much wood you are going to need and how to make slight alterations to your desk to trim material costs. By shaving a few inches off the depth of my desk I was able to fit it all on two sheets of plywood.
Ready to start?
Below I’ve compiled a list of materials and tools that I used to build my creative workspace. The whole project ended up being around $250 when I was done, and basically took me a week to do. (I continued to run the business out of a spare bedroom upstairs.)
Ingredients
- 2 sheets of 4’ × 8’ × ¾” finished plywood (birch)
- ¾” pre-glued veneer edging (birch)
- Table legs from IKEA
- 1 can of Minwax Polycryllic
- Lots of sandpaper
- Desk grommets for cord wire management
Tools Needed
- Skill saw (make sure to use a sharp plywood blade!)
- Jig saw
- Drill
- Household iron (check with wife first)
Basic Tips & Advice
- Let Home Depot slice the bread. Most Home Depot stores (and other major hardware stores) have a huge vertical saw that’ll cut through plywood with minimal splintering. I didn’t realize how good of a thing this was until I made a cut with my skill saw and butchered one end of the desk. If you can’t get Home Depot to make the major straight cuts, invest in a new plywood blade… makes a huge difference.
- Use a sharp hole saw drill bit. I borrowed a hole saw from my father, and not only did it take 45 minutes to “burn” a hole through my desk, but I also killed my brand new drill in the process.
- Measure twice, cut once. Simple advice imparted to me early on by my father.
 The devil is in the edging. Applying a pre-glued veneer edging with an iron is super easy and makes a huge
difference. I picked up a roll of 50’ of the stuff for around $10 at Home Depot. I had never used it before,
but the “iron on” instructions seemed simple enough. Just be sure any corners on your desk aren’t too tight,
as you may have a hard time getting the iron in there (my chair cutouts were just a little too tight). After completing my desk,
I saw a tool in a Lee Valley catalouge that actually trims the excess veneer off. A palm sander works well, too.
The devil is in the edging. Applying a pre-glued veneer edging with an iron is super easy and makes a huge
difference. I picked up a roll of 50’ of the stuff for around $10 at Home Depot. I had never used it before,
but the “iron on” instructions seemed simple enough. Just be sure any corners on your desk aren’t too tight,
as you may have a hard time getting the iron in there (my chair cutouts were just a little too tight). After completing my desk,
I saw a tool in a Lee Valley catalouge that actually trims the excess veneer off. A palm sander works well, too.- Finishing touches take time. I used a pre-stain wood conditioner to make sure the grain would be fairly consistent on the surface of the desk. I didn’t really want my desk to look like a piece of plywood, but rather something you’d find at IKEA. I have no idea if the conditoner really helped or not, but I was lucky enough to get the look I was going for. After the conditioner I added four or five coats of polycryllic, and it probably could have used more. Don’t rush this part… you’ll kick yourself later if you do.
- Don’t forget anti-glare positioning. When positioning your workstation make sure to factor in any windows and the direction the sunlight filters into the room. You’ll want to keep your monitor facing the opposite direction. Or break out the wallet and invest in some blinds.
Wrapping up
What designer doesn’t see a completed project and spot things that could have been done differently, better, easier, etc?
I’m no different. So if you have any additional tips, suggestions, or even photos of your own workspace, please share.
![]()
ABOUT THE AUTHOR
Jesse Bennett-Chamberlain is the owner of 31Three and will be happy to receive any Google points he can get from that link. Jesse resides in Ontario, Canada, and reminds the Yanks that his latitude is approximately equal to that of California.57 Comments
Stock photography, type, and killer tees. Genuinely recommended by Authentic Boredom.
- Way too much light. Or do you work at night?
- And yes, push monitor/keyboards more back. CTS is a b**ch.
That desk looks great. I’ve been wanting to build something like that for my home office, but a lack of tools and funds has kind of slowed the process.
Home entrepreneurs rock! I want my own company at home too! F**k big corporations! Awesome tips too, but I’m bad with tools.
I heart skipped a beat when I say a cameronmoll.com update, imagining it was about web design, but hey… at least it’s not about the election 8^)
As the cliche goes, you have WAY too much time on your hands.
A floor plan in Illustrator? Links to materials?
= \
A-M-A-Z-I-N-G post
I wish I had known earlier. I would have sent you this handy little link.
But think of it this way: now you have a scale model of your office in Illustrator. That will definitely be useful in the future…I’m sure.
Very nice! I made a desk over a year ago using similar techniques. The best part of the project is getting the satisfation that you created it. Plus, its easier on the wallet. Great work!
I’m feeling the CTS burn right now actually. One thing I wish I did was make the corner openings a little bit more narrow so my elbows could sit on them a little easier. As it is I just use my chair arm rests.
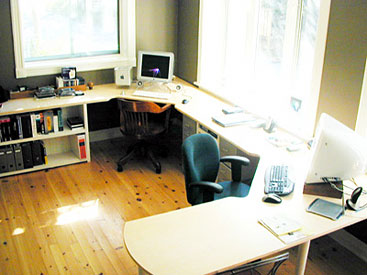
I did put up some blinds after these photos were taken, because as you can see… there is a lot of natural light in the office.
The links the to the materials was just me being an overachiever (this being my first ever blog post and following Cameron is not the easiest). The illustrator floor plan was actually super useful… and I figured it wouldn’t be a real authentic article without a download of some sort.
Please read: I generally avoid replying to comments on guest articles, but this discussion is all over the place.
- First, recognize that *I* invited Jesse to guest author here on Authentic Boredom. He graciously accepted the invite, so please be respectful of him and any future guest authors.
- Second, how is mapping a floor plan and adding links to materials too much time on one’s hands? Who in their right mind wouldn’t create a detailed plan for a desk the size of Jesse’s? I’m having a hard time understanding how you *can’t* afford the time to plan before building.
lol, Jesse, looks like we hit the ‘Fire’ button at the same time…
I’m intrigued by the finishing, but the natural light doesn’t offer a good look at it. Any—more detailed—images of this so I can have a good look!
Also, dig your floors. Beautiful. Real Wood?
Very cool. I love seeing projects like this.
Also, thanks for including your methodology - it will undoubtedly come in handy in the future!
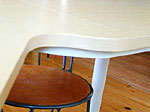
I can’t believe you created such a large (and very nice!) desk for just $250! Thanks for the links to materials and the desk blueprint download. I do have a question, though. You said the plywood was just 3/4” thick. And so is the veneer edging. But looking at the pictures of the finished desk, it really seems the desk is much thicker. Is it a trick on the eyes, or did you do something to give it a thicker (and more expensive) look?
This is just awesome! I’ve actually had serious plans to build a desk myself soon. I will return to this article, thanks :) (and very well done!)
Damn, you’re a crafty guy!
Fantastic job on the table, it looks amazing.
Sorry, I wasn’t trying to be offensive, just funny. But I do hope the link I posted is useful in the future.
I bought a desk my local council were throwing out. Total bargain at 20 quid.
It weighs about 250 pounds, has a solid metal frame with a hideous plastic teak effect top which is scratched and stained from years of hard use by faceless local authority automotons.
I love it.
No, you’re fine, Tom. Thanks.
I kept running into the same issues in terms of my needs for a two computer desk/workspace only being met by $2000-3000 solutions. (And even those options weren’t quite perfect.) A few trips to Home Depot later… I work on perfection everyday and it cost me $200.
Oh, and I layed out my whole office in Illustrator before I bought or made the first piece of furniture. You’re not alone in your planning habits.
Jesse! Thanks for the amazing article covering your newly improved office! I appreciate the thorough detail in which you provided. Thanks to Cameron for allowing such a wonderful guest writer! I love this site! Thanks!
I’d also like to see some more detailed photos of the desk and general work area. For those of us fortunate to have a specific room at home for all our gear, it’s nice to see how others handled their room’s needs. And since we’re all designers, we can borrow the good bits from one person’s design and merge it into our own… ;-)
Amazing! Congratulations Jesse for your nice home office and beautiful desk, and thanks Cameron for inviting a friend with such original idea for a post.
I am building my new house, brick by brick, actually is the first one, and I hope to have my work space really organized too.
Actually my home office was the first part of the house that was built, I also have two windows and plan on having a desk with two computers, my wife’s and mine.
We all live of this stuff and deserve having comfortable and nice spaces to do our work :)
Regards!
Jesse - get yourself a second monitor for each machine. Photoshop in particular is *soo* much better with twich as much screen space to work with :-)
Thanks for all the kind words.. much appreciated
Unfortunately I don’t have any shots of the surface of the desk and right now I don’t have a surface that isn’t covered with paper and clutter. It came out really well though, very similar to what you would see in ikea (the surface anyway), with very minimal grain.
Oh.. good eye Ray. On the underside of the desk I mounted some 1/2” MDF boards to make the desk appear thicker. I inset them a bit so that I wouldn’t hae to worry about making the edge super thick. It gives it a little bit more stability too.
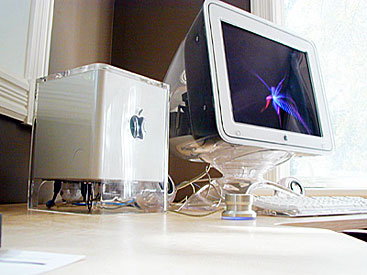
Olly, neither of my machines can power an external monitor. I have a 700mhz eMac and a 450mhz cube. I had two monitors at a previous job and actually didn’t really like it that much… found that was mousing too much. That’s my excuse anyway.
Anyone got any photos of their workspaces? I’d love to see what this “blogosphere” works on.
whoops… spoke too soon. I found some more photos that kinda show the workspace a bit better and the surface of the desk…
Sorry for just throwing them in a directory.
That is a great desk! I have a similar setup in my office but it takes three desks - one of which a huge old worktable from a school staffroom, graffiti-coated and great)
However, I am just in the process of finishing the bookshelf that covers the entire rear wall (except for the door). It should be finished before the weekend. It cost me $300 of pine, stain, filler and sealer and a week and half solid work for two, but it is beautiful and huge!
I planned mine out on paper though… I guess I’m just not geek enough!
Cameron, this is an awesome post.
I’ve always been a sucker for a good demonstration. That desk was nicely executed. Who needs the real thing when you can make your own for thousands of dollars less?
You should have your own show on HGTV. Seriously ;)
I forgot to ask one thing though… that wooden chair cannot possibly be comfortable. It has to be worst than this kitchen chair that I’m sitting in right now.
Awesome post, just what I was looking for. I’ve been going through the IKEA catalog for affordable office solutions. This, together with my father’s handyman skills, should provide an even more affordable solution. The list of goods required is handy as well. It all adds that professional finished look.
Excellent article from a guest host and fellow Canuck.
Gasp! Is that a mac cube? I thought those were a extinct. :D
Cameron, your impecible taste in design runs over into interior design. Excellent article.
Nice post. I had a similar desk in my old computer room before I moved out.. it was nice. I always like those corner spots. I’m really diggin’ your setup though. Only downside is I’d never get work done, I’d end up staring out the window too much :p
I’d love to get a nice workspace going on some day. After I get a house of my own… a few years from now :)
Good Post, Cameron! I just didn’t liked the remark “check with your wife about the iron”. Kind of sexist, don´t you think? I’m married, and still, I iron our clothes as much as my wife. She’s not my personal slave.
Sorry if I offended with the iron remark. My wife is really into quilting and using her iron on a construction project is something I thought I’d run by her. Personally I don’t use an iron much (Did I mention I work at home?)
Reminder: Jesse built the desk and authored this article, not me.
Yes, Cameron, I realized that now but It was already posted…
Personally, I love the fact the plans are shared online…It’s almost like an open source desk project that I will definitley partake in, seeing as though I am working from a glorified TV stand. Hard to get work done when you have no desk space.
I’m astounded! The desk looks great, it seems that you are quite the craftsman, Jessie….me on the other hand? I can make a nice PB&J, but that’s about it! ;)
Great post. Really helpful where we’re building a house right now.
How did you find those drawers that seem to fit perfectly? Just curious.
I built those shelves in there as well. When we moved into the house the office was full of huge pine shelves about 1-1/2” thick. I cut some of those up and measured out my printer and some small ikea boxes I had laying around and created the shelf to fit.
Gasp! Another Jason G a few comments up!
Anyway, this is good timing for me, since I can’t seem to find a desk I like and am growing tired of using my dining room table as a computer desk.
Thanks for posting this.
Damn.. you’re crazy. Truly a DIYer.
You know what I love best about the web. Articles like this. Everyone’s a handy man at heart. Nice peice of work all the way around Cameron, the desk and the article.
I’m in the (long) process of building a desk from one of our maples hurricane Juan knocked over last fall.
Hi Cameron and Jesse. Good work on the remodeling and desk project Jesse! I wish I had time to do something like that. I have not heard from either of you on CHP in awhile. Both of you served as a great inspiration, we would love to hear from you sometime. Take care, hope all is well.
Ian—AKA: Daytonian
just fyi, another semi-related project is Dan Cederholm’s transformation of a walk in closet to an office http://www.simplebits.com/notebook/2004/03/25/particle_board_desk.html
Using the preconditioner definately helped with equalizing the grain in the wood. Basically, it closes or reduces the pores in the grain, so they hold less stain, thereby reducing the amount of pigment. Another method is to sand the surface multiple times, each time moving to a finer and finer grit. Regardless, I know you didn’t stain this, and kept it its’ natural tone, but it helped all the same. Great work! Now I feel silly for spending $800 on my huge IKEA desk(s) from their office collection.
I don’t see anything for playing music. Where’s the stereo!?
Great post, I always enjoy seeing these kinds of solutions. Designers and their workspaces are an interesting topic, given the overlap between the creative process and the environments we create around us. Jesse, in looking at those bigger pictures, I was curious to know where you got those metal cabinets (the ones with drawers on either side of your printer)?
Those metal cabinets come from IKEA. I wouldn’t recommend them though as the drawers are super sticky and can be pretty sharp too (I cut my finger pretty good on one once).
The music? It’s all on iTunes.
How did you seam up the boards, I am making a desk with similar techniques and Im trying to figure out how to connect all the pieces together, Do I need to use the MDF underneath the seams or what please help.
That’s some nice handywork, you must be proud.
i LOVE the wall color.
what is it?
The wall colour is called potato peal and I got it at Canadian Tire… it’s a Martha Stewart colour. The paint sucks… but the colours are nice.
hey, Jesse, Cameron
Long time no see…
Good luck with your endeavours!
Hey Raja, I was just on your site a couple days ago, seeking logo inspiration…
There’s a friend of mine in school who is mapping her entire apartment out in Illustrator to scale. Full screen at 1024 x 768 it’s only at about 17% zoom… Additionally she’s going so far as to recreate patterns, items and other details like the individual keys on her Powerbook.
Great workspace! I love seeing and getting ideas on office space. Design translates into not only the concepts we create on screen, but also the space in which we create it… pimpin space ;)
Authentic Boredom is the platitudinous web home of Cameron Moll, freelance new media designer, author, and speaker. More…

Full-time and freelance job opportunities. Post a job...
A selection of fine reading, available for a limited time only:
- Jobs home page reorg
- Coming soon: Mobile Web Design, the book
- Dyson ad: Text as more than just words
- Setting sail for Europe
- Review: Sumo Omni bean bag chair
- Dashboard widget for Authentic Jobs
- Limited-time offer: $99 listings
- Nine skills that separate good and great designers
- Fire sale
- Introducing AuthenticJobs.com
 CSS Mastery: Advanced Web Standard Solutions A solid round-up of indispensable CSS design techniques by Andy Budd, Simon Collison, and Cameron Moll.
 Mobile Web Design A guide to publishing web content beyond the desktop. Tips, methodology, and resources. Now available.
![]() Letterpress Posters The unassuming beauty of a freshly letterpressed print.
Letterpress Posters The unassuming beauty of a freshly letterpressed print.
![]() That Wicked Worn Look. Techniques for that worn, aged, distressed look.
That Wicked Worn Look. Techniques for that worn, aged, distressed look.
![]() Mister Retro Machine Wash Filters Turn the dial to “Instaworn” with these filters.
Mister Retro Machine Wash Filters Turn the dial to “Instaworn” with these filters.
![]() Blinksale Dive in and enjoy shamelessly easy invoicing from Firewheel Design.
Blinksale Dive in and enjoy shamelessly easy invoicing from Firewheel Design.
![]() Basecamp My preferred web app for internal and client project collaboration.
Basecamp My preferred web app for internal and client project collaboration.
![]() HOW Conference Austin, June 24–27. Pentagram, Adobe, P&G, et al.
HOW Conference Austin, June 24–27. Pentagram, Adobe, P&G, et al.
![]() Web Design World Seattle, July 20–22. Practical sessions on web design.
Web Design World Seattle, July 20–22. Practical sessions on web design.
![]() Stimulate Salt Lake City, September 2009. Entrepreneurship and design conference.
Stimulate Salt Lake City, September 2009. Entrepreneurship and design conference.
Linkage:
Follow me: ![]()
1 marko ~ 02 November 2004 at 08:09 AM
This looks great, but i suggest you push your monitors more in those corners, so you can also put keyboards more distantly from the edge of the table. Your elbows will be thankful :)